Showing posts with label baking. Show all posts

Sunday, March 5, 2017

Desperate Fauxnkernickel

Fauxnkernickle


For whatever reason I am particularly loath to discard extra sourdough starter, but you can only give it away so many times, and the chickens don't always seem to want it (stupid chickens). What follows is less a recipe and more an act of desperate frugality combined with a child's witches' potion.
Ingredients:
  • all the sourdough starter you were about to throw out 
  • some liquid (filtered water, milk, whey from cheesemaking, cold coffee or tea, a stale beer, whatever), maybe 1/2 to 3/4 of a cup
  • 2 tsp salt
  • some molasses (2 tbsp?)
  • 2 heaping tablespoons cocoa powder
  • optional caraway seeds (if you don't care if your kids spit the bread out of their mouths and regard you with a deep and lasting sense of betrayal)
  • some sort of fat (olive oil, melted butter, coconut oil, lard, tallow, schmaltz, used motor oil,  whichever you grab first), maybe 2 tbsp
  • some rye flour (I don't know how much, just "enough" whatever that is).
  • some whole wheat flour (seriously I don't know) 
  • white flour on hand for kneading
  • a small handful of cornmeal, grits, or semolina for the stone (whatever is around)
Equipment
  • large bowl for mixing and initial proofing
  • wooden spoon
  • a large banneton or other vessel designed to shape and structure the loaf while proofing (this dough is more dense than my usual sourdough pain de campaign, but doesn't mind the help)
  • large baking stone
  • clean kitchen towel
  • bread lame or sharp knife
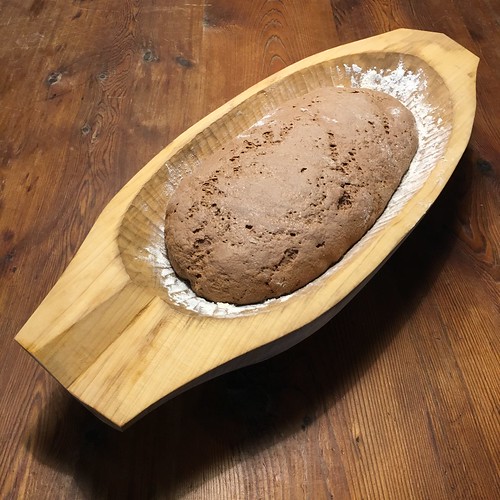
Magnolia Proofing Bowl

1. Dump all of the random liquid, molasses, cocoa powder, salt, and random fat into a bowl and mix.
2. Dump in the starter you are salvaging.
3. Begin adding flour; maybe a full cup of rye to begin with then whole wheat to round things out. The goal here is to get things to form a ball that holds together, but still becomes tacky on the surfaced when worked for more than a few seconds. Once it forms a good ball I switch to sprinkling white flour, just enough to keep the surface dry enough to work.
4. Knead for a few minutes, just to make sure things are well mixed. Kneading will not help this bread tremendously. There is too little protein in the dough to form many gluten chains, and the abundance of bran particles will probably just cut them anyhow.
5. Flour or oil the mixing bowl, and allow to sit covered with a damp cloth for 2 or 3 hours.
6. Shape into a loaf and transfer to final proofing vessel. At this point you can retard in fridge out of convenience, but it is not necessary.
7. Once nearly doubled in size (about 3-4 more hours) from shaped loaf, bake (slashing the top) on a preheated stone for 10 minutes at 500 ºF (260 ºC) with steam for a crisp crust, followed by 25-30 minutes at 350 ºF (177 ºC).  Bread should sound hollow when thumped on bottom. It will be dense, but pleasantly spongey and chewy (the crumbs practically bounce), good for kids who complain that their honey falls through the holes in the "other" bread.

Weekly Pain de Campagne

Pain de campagne


I have given this recipe out often enough recently that it ought to be written out here. This is our weekly to semiweekly country bread. We have two smallish bannetons, so I usually divide it into two loaves, though sometimes I braid it and proof it as a single loaf in our big wooden proofing bowl. This is a slow, slow sourdough. If I start this the moment I get home from work, it is usually ready for Jami and the boys to eat by lunch time the next day. That is not to say that it is particularly labor intensive, just slow. Other than that it is fairly forgiving, tastes great, and is decently sliceable for several days out on the counter (though never better than right out of the oven), and decidedly un-fancy.
Ingredients:
  • 1 cup rye flour
  • 1 whole wheat flour
  • 2 cups white flour
  • 2 cups filtered water
  • 2 tsp salt
  • 1 cup sourdough starter 
  • 1 tablespoon olive oil or other fat (only if needed to oil the container for bulk fermentation)
  • extra white flour for kneading and shaping later on
  • a small handful of cornmeal, grits, or semolina for the stone (whatever is around)
Equipment
  • stand mixer with dough hook
  • measuring cups
  • large bowl for proofing
  • 2 bannetons or other vessel designed to shape and structure the loaf while proofing (this is a fairly loose dough, and will form a sad puddle of bread without some guidance)
  • large baking stone
  • wooden or plastic spatula
  • bench scraper
  • clean kitchen towel
  • bread lame or sharp knife
Day 1: mixing and proofing
1. Make sure starter has been fed and is active at least two hours before beginning.
2. Blend the flours in the mixing bowl, mix in 1 1/2 cups of water, and autolyse for 2 hours (this allows enzymes in the flour to begin breaking the starches down into sugars, rye is very good at this).
3. After 2 hours add the remaining 1/2 cup water with salt dissolved into it.
4. Add starter.
5. Knead on dough hook for ten minutes, stopping occasionally to scrape any of the drier flour mixture from the bottom of the bowl and incorporating it more fully into the dough.
6. Transfer to large oiled bowl and cover with a damp towel for 2-3 hours for bulk fermentation in a reasonably warm part of the house.
7. Pull dough out onto a floured surface to divide and shape into loaves.
8. Place loaves into well floured bannetons.
9. Cover bannetons with a damp towel and place in refrigerator to retard (ferment slowly) overnight.
10.  It's probably close to midnight now. Go to bed.

Day 2: baking
1.  Remove bannetons from the refrigerator, rewetting the towel if necessary.
2. Allow loaves to sit until nearly doubled in bulk from their original size after shaping, keeping in mind that they may have risen somewhat overnight. This is highly temperature dependent. The loaves are obviously cool, and if the house is cool they will warm more slowly and continue to rise more slowly still.
3. Begin preheating stone to 500 ºF (260 ºC) about 30 minutes to 1 hour before baking.
4. Once the loaves are ready, sprinkle some polenta or semolina onto the stone (to prevent sticking), and dump the loaves out of the bannetons onto the stone, slashing the tops once they are in place.
5. Splash some water in the oven if you prefer a harder crust.
6. Bake at 500 ºF (260 ºC) for 10 minutes.
7. Reduce heat to 350 ºF (177 ºC), and bake for 25 more minutes (or longer for a darker crust since that seems to be in vogue nowadays).
8. Bread should sound hollow when thumped on the underside if it is fully cooked.

Thursday, October 13, 2016

Dutch Babies: the Principle (plus apple cardamom option)

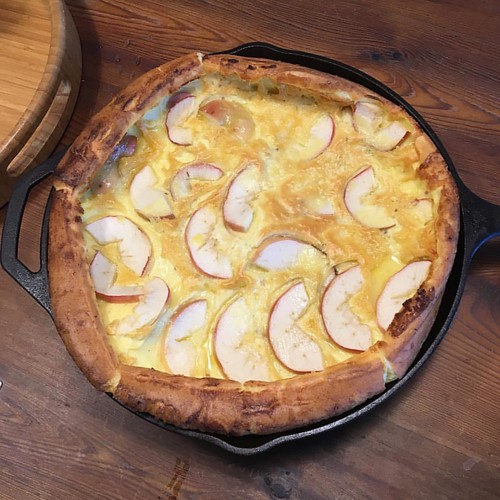
Apple cardamom Dutch-baby.


Presented here is the most basic, serviceable version of a German pancake/Dutch baby, with a fully elaborated apple cardamom version (inspired by Jami waving a photo of such a thing at me from her phone, and rather than reading the recipe I thought, "oh, I can do that." So I did.).

The Principle (as a ratio per 2 eggs)
  • 2 eggs : flour 1/3 cup : milk 1/3 cup
  • butter 1-1 ½ tbsp per egg
  • some salt
  • some vanilla extract
Ingredients for Apple Cardamom Dutch Babies
  • 6 eggs, room temperature
  • 1 cup flour
  • 1 cup milk
  • pinch of salt
  • 1 tsp vanilla extract
  • 4-6 cardamom pods, husks removed, seeds ground 
  • ½-1 apple, thinly sliced
  • ¼ cup (½ stick) butter
Equipment
  • mixing bowl
  • whisk
  • 10 inch cast iron skillet
1. Preheat oven and skillet to 415˚F/213˚C.
2. Whisk flour into eggs until fully incorporated.
3. Add salt, cardamom, and vanilla extract.
4. Slowly whisk in milk.
5. Melt butter in preheated skillet.
6. Scatter apple slices in melted butter.
7. Pour batter over apples (they'll float).
8. Bake for 15 minutes.
9. Serve with powdered sugar, or maple syrup, or both, or jam, or anything really.

Friday, July 27, 2012

Pretty Good Made-up Bread


This is a totally made-up-on-the-spot recipe. I hadn't made bread in a while, and I'd just strained a batch of kefir, and I had ground flax seed on hand from my horrid breakfast beverage, so this is what happened.

Ingredients (for "sponge")
  • 2 cups warm water
  • 2 tsp yeast
  • 2 tbsp molasses
  • 2 tsp sea salt
  • 2/3 cup strained kefir
  • 1/4 cup ground flax meal
  • 1 cup rye flour
  • 1 cup whole wheat flour
  • 1 cup unbleached bread flour
  • 1/4 tbsp olive oil
Remainder
  • roughly 5 cups unbleached bread flour
  • a handful of cornmeal
  • a splash of olive oil
Equipment
  • measuring cups and spoons
  • a kitchen mixer with bread hook 
  • or a big bowl
  • a damp cloth
  • someplace warm
  • a baking stone (or a baking sheet, if you're lame;)
  • a small ovenproof bowl of water
  • a pizza peel
  • small knife, preferably serrated
1. Sprinkle the yeast and molasses into the warm water and proof (7 to 10 minutes).
2. Mix in the remainder of the "sponge" ingredients. This is a totally fake sponge. Real sponges take at least 12 hours and have a more complex, sourdough-like smell. This is quick and dirty with the kefir added for some microbiological complexity.
3. Set mixture covered in a warm place (I set mine above the water heater) until very bubbly. 1 to 2 hours.
4. Mix in remainder of flour. I'm deliberately vague about the exact quantity. This should be a soft, sticky dough, nearly as sticky a sourdough, but not quite.
5. Knead for 10 minutes.
6. Form in to a ball and transfer to a large bowl that has been oiled with olive oil.
7. Dust top with extra flour and cover with damp cloth.
8. Return to warm place and allow to rise until doubled. About 1 hour.
9. Punch down and return to rise until doubled in warm place, or if you need to slow things down you could put it in the fridge for a while. This will gain you up to 4 or 5 hours on the final rise.
10. Place baking stone and an ovenproof bowl of water in oven
11. Preheat your oven to 415˚ F or 213˚ C.
12. Divide dough and form into two torpedo shaped loaves on a flour dusted pizza peel.
13. Dust loaves with flour and allow them to rest for about 10 minutes.
14. Throw cornmeal onto baking stone and slide loaves on.
15. Slice top of loaf with a serrated knife or wet paring knife (wetting the knife keeps the dough from sticking and pulling, a serrated knife works dry).
15. Splash a handful of water onto the base of the oven (if this won't cause all kinds to nastiness to fly up), or spray water in oven with a mister (avoiding loaves).
16. Bake for 10 minutes then reduce heat to 375˚ F or 190˚ C.
17. Bake another 25 to 35 minutes. This a dark bread already thanks to the molasses and rye and wheat flours, so rather than eyeball it, pick up a loaf and thump the bottom. It should sound hollow.
18. Allow bread to cool before cutting into it. Baking continues for several minutes after it comes out of the oven, and cutting into it while it's hot (it's so tempting, I know!) can ruin the internal structure of the loaf.

This bread is great with butter from happy cows (we get ours locally from Lucky Layla at Lavon Farms, or Kerrygold is a great supermarket alternative), and honey from a backyard hive, or jelly from foraged wild fruits (I made mustang grape jelly a couple of weeks ago). It also makes decent torijas.