Showing posts with label frugality. Show all posts

Sunday, March 5, 2017

Desperate Fauxnkernickel

Fauxnkernickle


For whatever reason I am particularly loath to discard extra sourdough starter, but you can only give it away so many times, and the chickens don't always seem to want it (stupid chickens). What follows is less a recipe and more an act of desperate frugality combined with a child's witches' potion.
Ingredients:
  • all the sourdough starter you were about to throw out 
  • some liquid (filtered water, milk, whey from cheesemaking, cold coffee or tea, a stale beer, whatever), maybe 1/2 to 3/4 of a cup
  • 2 tsp salt
  • some molasses (2 tbsp?)
  • 2 heaping tablespoons cocoa powder
  • optional caraway seeds (if you don't care if your kids spit the bread out of their mouths and regard you with a deep and lasting sense of betrayal)
  • some sort of fat (olive oil, melted butter, coconut oil, lard, tallow, schmaltz, used motor oil,  whichever you grab first), maybe 2 tbsp
  • some rye flour (I don't know how much, just "enough" whatever that is).
  • some whole wheat flour (seriously I don't know) 
  • white flour on hand for kneading
  • a small handful of cornmeal, grits, or semolina for the stone (whatever is around)
Equipment
  • large bowl for mixing and initial proofing
  • wooden spoon
  • a large banneton or other vessel designed to shape and structure the loaf while proofing (this dough is more dense than my usual sourdough pain de campaign, but doesn't mind the help)
  • large baking stone
  • clean kitchen towel
  • bread lame or sharp knife
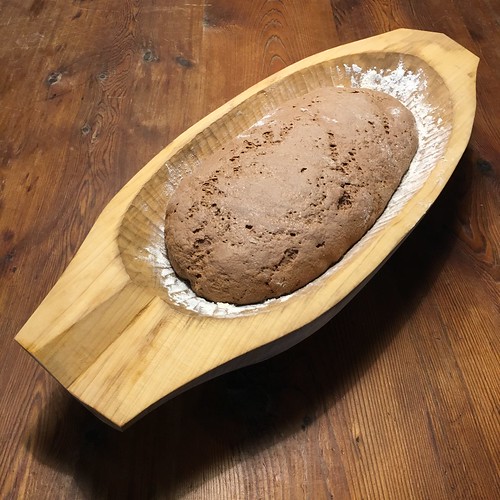
Magnolia Proofing Bowl

1. Dump all of the random liquid, molasses, cocoa powder, salt, and random fat into a bowl and mix.
2. Dump in the starter you are salvaging.
3. Begin adding flour; maybe a full cup of rye to begin with then whole wheat to round things out. The goal here is to get things to form a ball that holds together, but still becomes tacky on the surfaced when worked for more than a few seconds. Once it forms a good ball I switch to sprinkling white flour, just enough to keep the surface dry enough to work.
4. Knead for a few minutes, just to make sure things are well mixed. Kneading will not help this bread tremendously. There is too little protein in the dough to form many gluten chains, and the abundance of bran particles will probably just cut them anyhow.
5. Flour or oil the mixing bowl, and allow to sit covered with a damp cloth for 2 or 3 hours.
6. Shape into a loaf and transfer to final proofing vessel. At this point you can retard in fridge out of convenience, but it is not necessary.
7. Once nearly doubled in size (about 3-4 more hours) from shaped loaf, bake (slashing the top) on a preheated stone for 10 minutes at 500 ºF (260 ºC) with steam for a crisp crust, followed by 25-30 minutes at 350 ºF (177 ºC).  Bread should sound hollow when thumped on bottom. It will be dense, but pleasantly spongey and chewy (the crumbs practically bounce), good for kids who complain that their honey falls through the holes in the "other" bread.

Sunday, March 25, 2007

Tomate Frito


This is a typical Spanish tomato sauce, and it was all I used when I lived in Spain. When I couldn't find it back in the States I sadly put it out of my mind hoping that the inferior, over-sweet flavor of Hunt's or Hill Country Fare would again become familiar. I don't know why it never occurred to me to make it myself. Probably the fact that tomatoes are outrageously expensive in the States, while I can get 3 kilos for 25 ฿ (about 70¢) here in Thailand. I'll have to talk J's Papa into growing more Brandywines for me (no one there likes to eat them since they look lumpy).

Ingredients
  • 3 kilos/6.5 lbs of ripe tomatoes
  • 5 tbsp olive oil
  • 1 tsp salt
  • 1 tbsp evaporated cane juice
  • 1 garlic clove
  • a sprig of parsley or basil
Equipment
  • 2 sterile quart jars or 4 pint jars
  • large pot
  • sieve
  • knives and stuff
  • blender
1. Seed and chop the tomatoes. Save the seeds so you can strain the juice back into your chopped tomatoes.
2. Add the oil to the pot, then the tomatoes and everything else. Don't bother chopping the garlic or parsley.
3. Heat to a boil, stirring and mashing the tomatoes occasionally.
4. Reduce heat to a low simmer and cover for 30 minutes. Continue stirring and mashing.
5. Run it through the blender, and mix the results (it will take 3-4 batches) for the sake of homogenization.
6. Can the results. Since this is an acid food all it needs is 10 minutes in a boiling water bath.

Options: You can render a chopped onion or two in the oil before you add the tomatoes. Some recipes call for a dash of pepper. Use this like you would any tomato sauce. You'll never go back.

Yum, wolf-peaches.

Friday, March 2, 2007

Vegetable Stock on the Cheap


This idea came to me when I was working as a private gardener for a crazy woman. Really. Crazy. Full on paranoid neurosis. I had to go crap in the woods because she was scared of getting my poopoo germs in her toilet. Anyhow, once I got to come in from the cold for an hour and help prep vegetables for her "special spaghetti sauce." There must have been fifteen pounds of vegetables on the counter, awaiting cleansing and processing. I got to skin the mushrooms. I had never known anyone to skin mushrooms before, and these were just regular old Agaricus bisporus. By the time we were done there must have been ten pounds of perfectly edible vegetable scraps in the sink. It was a bit like watching a sushi master prepare fugu. I remarked that all those vegetables would make great stock, which earned me a grimace. So at home I started saving my own vegetable scraps in a gallon sized ziplock in the freezer, and when it was full I'd make stock--a practice which Jami and I continue to this day.

Anything can go in your scrap bag, almost. I cut out squishy parts, and I cut all the green parts off anything in the Solanaceae (tomatoes, potatoes, eggplant, peppers). This might not be necessary with the peppers, I just have a healthy respect for the genus Solanum. If you look at the picture above you'll notice onions, celery, lettuce, garlic, broccoli stems (I have yet to convince Jami that it's the best part), cardamom pods, tomatoes, peppers, dill, carrots, cabbage, turnips, and potatoes. We also add natural (unwaxed) cheese rinds, and fresh herbs we might not get around to using. Recently we began using some fruit scraps, like apple peels, and apple cores, and the liquids left over from reconstituting dried fruits and vegetables, like sun-dried tomatoes or dried mushrooms.

Ingredients
  • 1 gallon bag of vegetable scraps
  • water to cover
  • salt (optional)
Equipment
1. Fill a large stock pot (or its corresponding pasta insert) with the vegetables and cover with water.
2. Bring to a boil then reduce to a simmer. If your stock consists largely of greens 5 to 10 minutes at a simmer should be enough. If you have larger items, like onion halves, or whole vegetables, or whole heads of garlic, you can go 15 to 30 minutes. Remember, you're extracting nutrients, not making mush.
3. Add salt if you must. I usually wait until I know how I'm using the stock.
4. Allow the boiled stock to steep for a while, 20 minutes to an hour. I've even left it out over night and not died from it. All the solids will keep it warm for a long time.
5. At this point you need to decide how you want to keep your stock. You can freeze it in ziplock bags, or plastic containers. We like to can it in quart jars while it's still hot. Stock will keep for about five days in the fridge. Strain it as you pour it into its container.

Options: Each batch of stock you make will be unique, depending on what kind of vegetables you've been eating. Greens will give you a nice clear stock, root vegetables will make it brown and hearty, and potato scraps will make it cloudy and starchy. If you would like to strive for some consistency you might separate your scraps according to kind, using different bags in your freezer, and settling on a mixture that you like. Sometimes I make two batches at once, and mix the results. It gives me some consistency but spares me the trouble of sorting. If your freezer space or ability to process large amounts of stock is limited, just keep your scraps in a sealed container in the fridge (they'll keep for about five days), and make stock as you need it, one quart at a time. This is what we've had to do lately. Jami got the idea from a Deepak Chopra cookbook of all places. It takes all of ten minutes, and is better than spending two dollars at the store for the salty, over-spiced slurry they sell there.

Compost the remainders.